Hey everyone, it’s me again, Dan, welcome to our recipe site. Today, I’m gonna show you how to make a distinctive dish, realistic character cakes for birthdays. One of my favorites food recipes. For mine, I will make it a little bit tasty. This is gonna smell and look delicious.
Check Out our Selection & Order Now. Free UK Delivery on Eligible Orders! We provide you only the best Realistic Character Cakes for Birthdays recipe here. We also have wide variety of recipes to try.
Realistic Character Cakes for Birthdays is one of the most popular of recent trending foods in the world. It is appreciated by millions every day. It’s easy, it’s fast, it tastes delicious. They’re fine and they look fantastic. Realistic Character Cakes for Birthdays is something that I have loved my entire life.
To begin with this particular recipe, we must prepare a few components. You can have realistic character cakes for birthdays using 7 ingredients and 18 steps. Here is how you can achieve it.
The ingredients needed to make Realistic Character Cakes for Birthdays:
- Make ready 18 cm diameter cake Spongecake
- Make ready Ingredients for the filling and outside:
- Get 2 cartons Heavy cream
- Prepare 60 grams Sugar
- Prepare Filling and Decoration
- Take 1 Fruit (I recommend kiwi and canned peaches)
- Take 1 Cookie or Chocolate pen (for the face)
No matter what your child's favourite character may be, we can create delicious birthday cakes to suit all sizes and budgets. The price of our cakes depends on the design you chose. All elements are made by hand and priced according to complexity. See more ideas about How to make cake, Birthday, Birthday cake.
Steps to make Realistic Character Cakes for Birthdays:
- Add heavy cream and sugar into a bowl. Whip until very stiff peaks form. This is an important point in decorating the cake.
- Slice the spongecake horizontally into 3 layers. Cut the top slice into 4 strips.
- In an 18 cm bowl, place 1 sheet of spongecake. Place the 4 cut strips on top. Lightly push to make the pieces fit evenly.
- Cut the fruit (it tastes better when there's a lot) into small cubes. Add about 1/4 of the whipped cream (adjust according to the amount of fruit), and mix.
- Add the mixture from Step 4 into the spongecake prepared in Step 3. Stuff it until becomes almost like a lid on the spongecake.
- Place the remaining spongecake on top, cover with a lid and gently push from the top to even it out.
- Flip it onto a plate and cover completely with whipped cream. If you decorate as in Step 9, coat with cream as thinly as possible. You can skip Step 9 if you want.
- If you do not decorate the cake as seen in Step 9, cut a milk carton and use the wide portion to lightly brush on the cream. This technique looks so pretty when finished!
- Using a star shaped decorating tip, pipe stars in a circle. If you use some strength at the top while squeezing, it will look pretty.
- When you finish covering the whole cake, decorate however you want using cookies, chocolate or a chocolate pen.
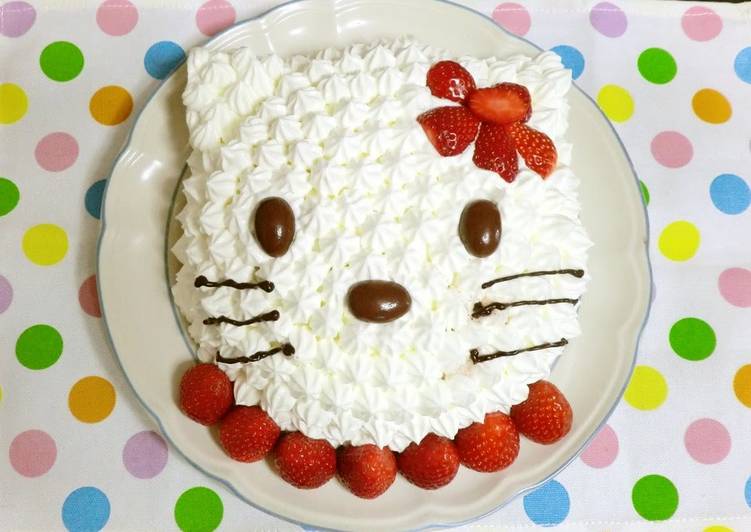
- I made the ears from square cookies placed diagonally. The eyes and nose are chocolate covered almonds, the whiskers are chocolate pen. The flower by the ear is made from strawberries.
- I made a rabbit version too. I added Monin-brand strawberry syrup to the cream to make a pink color. The eyes and nose are chocolate pieces, the mouth is made with a chocolate decorating pen! It's realistically fluffy and cute.
- The ears are Oreo cookies, the cheeks are strawberries, the eyes and nose are drawn with chocolate pens. Garnishing with a message on cookies is ok too.
- Mix heavy cream and cocoa powder with a tiny bit of boiling water. The eyes are chocolate covered almonds, the nose is made from cookies with strawberry jam.
- Here's the Mickey version: the big ears are baby senbei (rice cracker). Since they're heavy, I supported them with wafers. I tried cutting the strawberries and mango into little hearts.
- Here's the Anpanman version: the eyebrows, eyes, and mouth are made from chocolate pen. The nose and cheeks are cookies!
- The pink is strained blueberry jam mixed with cream. The ears are 2 round baby senbei (rice crackers) covered with cream drawn as hearts.
- It's also cute if you use a small bowl or tea cup to make mini cakes.
All elements are made by hand and priced according to complexity. See more ideas about How to make cake, Birthday, Birthday cake. See more ideas about character cakes, cupcake cakes, kids cake. The same great prices as in store, delivered to your door with free click and collect! We will work with you to design a beautiful cake for your occasion whether it is a wedding, anniversary, christening or birthday we hope our cakes will make your special day even more amazing.
So that is going to wrap this up with this special food realistic character cakes for birthdays recipe. Thanks so much for your time. I’m sure that you will make this at home. There’s gonna be more interesting food in home recipes coming up. Remember to bookmark this page on your browser, and share it to your family, friends and colleague. Thanks again for reading. Go on get cooking!